4 Basics
The tutorial example shows the building of a simple application and how its GUI is expressed in QTk. This chapter details all the information needed to start working with QTk. The geometry management and the different principles of QTk are described.
4.1 Geometry management
The geometry management is done by means of dedicated container widgets:
tdwhich organizes widgets top down.lrwhich organizes widgets from left to right.
By default all widgets take exactly the size they need to draw themselves. If there is more space available, widgets are centered by default inside that space. That behavior can be changed by the glue parameter. Valid values for this parameter are atoms that are a combination of the letters n, s, w and e that correspond respectively to the top, bottom, left and right side of the widget. Gluing a side consist of placing a constraint on that side with its corresponding neighbor. Gluing two opposite sides results in the widget taking all the space available in the direction of these sides.
Let's consider:
lr(glue:nswe
   button(text:"Left")
   button(text:"Right"))

This describes a frame with two buttons placed side by side horizontally. If the user resizes the window, the frame is split in equal space and each button is centered within its own space.

We can add constraints to control the geometry of the widgets by using the glue parameter:
lr(glue:nswe
   button(text:"Left" glue:e)
   button(text:"Right")

Now the east border of the left button is constrained with its right neighbor. When the window is resized, the two buttons stick themselves together, centering themselves in all the available space.
lr(glue:nswe
   button(text:"Left"
   button(text:"Right" glue:w))
This is the same as the previous example as the west border of right button is constrained with its left neighbor.
It is also possible to ask widgets to take as much space as available:
lr(glue:nswe
  button(text:"Left" glue:we)
  button(text:"Right"))

The first button is glued to both horizontal sides. The second button takes just the necessary size to draw itself (default behavior). As a result, the second button is stuck to the right while the first button takes all the remaining available horizontal space.
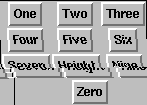
td widgets can be placed inside lr widgets and vice versa. By combining these widgets and the glue parameter, complex windows can be built. However it is hard to obtain windows that need a grid structure like a calculator:
td(lr(button(text:"One")   button(text:"Two")    button(text:"Three"))
   lr(button(text:"Four")  button(text:"Five")   button(text:"Six"))
   lr(button(text:"Seven") button(text:"Height") button(text:"Nine"))
   button(text:"Zero"))

As the text labels aren't the same width, the buttons are not vertically centered. There is a way to achieve this: newline.
lr(button(text:"One")   button(text:"Two")    button(text:"Three") newline
   button(text:"Four")  button(text:"Five")   button(text:"Six")   newline
   button(text:"Seven") button(text:"Height") button(text:"Nine")  newline
   button(text:"Zero"))

newline introduces a new line (or column for the td widget) using a grid structure, such that widgets are aligned on several lines.
Another uselful command is empty which leaves an empty space:
lr(button(text:"One") button(text:"Two") button(text:"Three")     newline
   button(text:"Four") button(text:"Five") button(text:"Six")     newline
   button(text:"Seven") button(text:"Height") button(text:"Nine") newline
   empty button(text:"Zero") empty)
Note that newline and empty are not widgets and that they don't support parameters (they don't have a glue or a handle parameter for instance).
4.2 Interacting with widgets
The description record of the window defines:
The geometry parameters of the window
The initial state of the widgets
This section describes how the inner state of the widgets can be dynamically changed. Changing the geometry of the window is possible using the placeholder or the grid widgets. This will not be detailed here (see Section 7.13).
To modify the state of a widget, we need a way to reference this widget: the handle parameter.
local
  B
  Desc=td(button(text:"One" handle:B))
  Window={QTk.build Desc}
in
  {Window show}
  {B set(text:"Two")}
end
While building the window, all handle variables are bound to objects that grant control over the corresponding widgets. These objects have interfaces depending on the nature of the widget they are controlling. However these interfaces were made as uniform as possible and contain at least the following methods:
set(parameter:value): changes the value of the parameter of the widget.get(parameter:free_variable): binds the variable to the contents of the parameter of the widget.
Several parameters can be set or get in a single command:
{B set(text:"Three" bg:red)}See the specific widget documentation for specific parameters.
Another way of getting a handle is to use the feature parameter:
local
  Desc=td(button(text:"One" feature:button))
  Window={QTk.build Desc}
in
  {Window show}
  {Window.button set(text:"Two")}
end
This is strictly equivalent to the previous example. Instead of using a variable, this method uses a feature of the parent object. Using handles or features is just a matter of taste as both methods are equivalent.
Most widgets have an init parameter that sets the initial state of the widget (depending on the nature of the widget):
local
  Window={QTk.build td(checkbutton(init:true  text:"Initial state is on")
                       checkbutton(init:false text:"Initial state is off"))}
in
  {Window.show}
end
Many widgets have also a return parameter to help building dialog box windows. return parameters are bound to the main (widget specific) value of their widgets WHEN the window is closed. For example a dialog box that asks for the name of the user can be written as:
local
  E
  Window={QTk.build lr(label(text:"Enter your name then close the window:")
                        entry(return:E))}
in
  {Window show}
  {Wait E}   % E is bound when the window is closed
  {Browse E} % Displays E
end
See the widget reference documentation for specific widget support of the return parameter.
4.3 Events and actions
So far we are still unable to dynamically interact with the user, as we don't know what he is doing. Actions can be associated to user events. Many widgets have a main event corresponding to the most obvious use of the widget. All other events can be finely defined using the bind method.
4.3.1 Main events
Most widgets raise an event just after the user has interacted with them:
After the user clicks on a button.
After the user selects an item in a list.
After the user types a letter in an entry.
After the user checks or unchecks a checkbutton.
And so on depending on the widget type.
These are called main events. Most simple uses are covered by these events. These events are defined by the action parameter of the object. An action can have one of these forms:
A zero parameter procedure.
A pair object_variable#method.
A pair port_variable#message.
A pair
toplevel#method.A pair
widget#method.
Where the last two are just shortcuts to object_variable#method with object_variable being a reference respectively to the window or the widget itself. A frequent use is button(text:"Close" action:toplevel#close).
local

  class C
    meth init skip end
    meth show(Msg) {Show Msg} end
  end
  O={New C init}

  R
  P={NewPort R}
  thread
    {ForAll R proc{$ Msg} {Show Msg} end}
  end

  Window={QTk.build td(button(text:"Procedure"
                              action:proc{$} {Show 'Procedure'} end)
                       button(text:"Object"
                              action:O#show('Object'))
                       button(text:"Port"
                              action:P#'Port')
                       button(text:"toplevel"
                              action:toplevel#set(title:"Toplevel"))
                       button(text:"widget"
                              action:widget#set(text:"widget clicked")))}
in
  {Window show}
end
4.3.2 Concurrency between actions
A unique thread is associated to each QTk window. All actions are serialized and executed in the first in first out order. If the window is closed, pending actions are ignored.
local
  Window={QTk.build td(button(text:"1"     action:proc{$} {Delay 2000} {Show 1} end)
                       button(text:"2"     action:proc{$} {Delay 2000} {Show 2} end)
                       button(text:"close" action:toplevel#close))}
in
  {Window show}
end
See specific widget documentations for further details.
4.3.3 Other events
There are many other events that you might want to observe. Widgets have the bind method to add actions to all these events.
local
  Window={QTk.build td(canvas(glue:nswe handle:C))}
in
  {Window show}
  {C bind(event:"<1>"
          args:[int(x) int(y)]
          action:proc{$ X Y} {C create(circle X-5 Y-5 X+5 Y+5)} end)}
end
The event parameter is a string describing the event to listen. Here "<1>" is the left mouse button being pushed down. The action parameter can only take the procedure, method or port message forms. See Section 8.11.1 for valid event parameter forms.
Events can also receive parameters. The example above shows how the coordinates of the mouse are obtained. The parameters to receive are specified by the args parameter (see Section 8.11.2). The action is called with as much parameters as specified with args.